Landscape Advice from the Experts
You should look at your landscape as an investment. The best way to protect this investment and make it grow is through proper care and maintenance. Here is some landscape advice to help you along the way.
-
Watering a newly installed lawn
SODDED LAWNS
Sod must be watered frequently from the moment it is rolled out until the roots grow enough to knit into the soil (usually 10 to 20 days).
Do not water more than 15 minutes in one place. New sod is not able to pick up water from below, therefore four well-spaced 15 minute waterings are much better than one 60 minute watering.
When grass is long enough to cut (about 2 1/2 - 3"), set the mower as high as possible and be sure the mower blade is sharp. Do not mow the lawn too short.
Watering once Hawks has left the site is the customer's responsibility. Because we can not control customer watering procedures, we can not guarantee the sod.
DANGER SIGNS
1. A DRY BLUE LOOK: Grass blades roll up and look like needles. Water immediately! Dry yellow areas will develop quickly if blue areas are not watered immediately. If dry yellow areas do appear, continue to water and the area will usually recover.
2. SHRINKING: If sod gets too dry, even once, it will shrink, creating unsightly seams. The sod will not expand completely to its original size and shape even after watering. If shrinkage does occur, water more frequently so that seam damage will be minimized.
SEEDED LAWNS
A newly seeded lawn must be kept damp, not soaking wet or muddy, for a minimum of three weeks, preferably more. The success of any lawn seeding is determined by the watering care it receives.
MULCH: Do not remove the mulching straw unless it is so thick it is suffocating the germinating seed.
WEEDS: Weed seeds lie dormant in the soil for years until proper growing conditions are present. Do not be concerned. Most weeds are annuals and can be controlled by mowing. Do not apply weed killer the first year. The second year, when the grasses have matured, any perennial weeds can be treated successfully.
MOWING: As soon as the grass (or weeds) is 3" to 4" high, reduce watering for 1 day to allow the soil to firm up for mowing. Set mower as high as possible. Do not pick up or bag the clippings.
FERTILIZING: approximately 4 to 6 weeks after seeding, Lightly fertilize with a starter fertilizer. Follow bag instructions. Do not use weed killer or "Weed and Feed" for the first year.
-
How to water your new landscape planting
TREES, SHRUBS, AND EVERGREENS
Water each plant three times the first week after installation, twice the second week, and once a week after that until the plant is established (a minimum of 2 months). The amount of water depends on the size and species of the plant, the time of year and the speed of water loss. The plant's roots need a cycle of wet and dry, this allows both water and oxygen into the root system.
Plants can go for a time without oxygen, but not very long without water. To promote this cycle, you need to water and cultivate the soil around the plant. Cultivating helps oxygen get into the root system by accelerating the absorption of water into the organic material, thus opening the space between soil particles and allowing oxygen down into the roots.
Avoid watering a grouping of plants with a lawn sprinkler. With the variation in height, you end up with an uneven distribution and promoting fungal-born leaf diseases as well as wasting water. Getting the leaves wet may be of value in very hot weather, when the water is leaving the plant faster than it can pull it out of the ground. As a general rule, however, putting mineral laden water on the leaves will dry them, make the leaves less efficient and can cause burning.
Evergreens, after being established, still need one more good watering in fall. Timing is important because if you water too early, you may spur late growth that will not have time to harden off before winter, or too late and the ground will be frozen. Early November is a good target time. This is done because in Wisconsin the ground is frozen for a long time, allowing no new water into the root system. But water is still transpiring out the top of the plant, and when all the water is gone, the plant turns brown. Positioning evergreens out of the winter sun and wind can reduce water loss.
AMOUNT OF WATER PER WATERING:
Trees 2.5-3" caliper size: 5-7 gallons per watering Trees 2" caliper size: 3-5 gallons per watering Evergreens 6-8': 5-7 gallons per watering Evergreens 3-5': 3-5 gallons per watering Large shrubs: 3-5 gallons per watering Small shrubs: 1-3 gallons per watering
Perennials and ground covers require deep watering to promote a deep root system. The deeper the root system a perennial has, the better it looks and grows. How a perennial is watered affects how the root system develops. Before you water, always check to see at what depth the soil is moist by digging around the plant. If only the upper layer of soil is wet, you need to use more water per watering and water less often. If perennials stay too wet for too long, the roots shut down and the top will wilt even if the plant is standing in water. Black leaves are a sure sign of too much water. Brown or wilted leaves indicate too little water.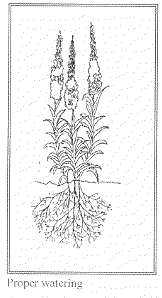
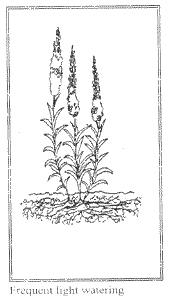 PERENNIALS AND GROUND COVERS
 -
Care for a newly installed landscape
FERTILIZING
1. TREES SHRUBS AND EVERGREENS
A water-based fertilizer will spark up color or kick up the growth rate. This is done only after the plant is somewhat settled, and only in spring or summer up to about mid-July or after October 15th. Time released surface fertilizers like Mag-amp or granular fertilizers can be used, but only in spring after a previous fall planting and at a 1/2 rate.As the plants become more established, you can develop a customized fertilizing program for your plants. The program could be one general type of fertilizer in early spring for all plants or a specialized program for each plant to maximize its potential with fertilizers, soil amendments and special treatments.
2. PERENNIALS AND GROUND COVERS
Amending of the soil is normally done with the installation of perennials and ground covers, but some extra hardy plants do not require it. Soil amending improves the structure of the soil, but you still will want to fertilize. Use a granular or time release fertilizer, low in nitrogen and higher in phosphorous and potash in early spring at least 3 months after installation. If you want to use a water-based fertilizer, start in the spring and use it every two weeks until July 15th.3. LAWN
The lawn fertilizing typically is done 5 times per year March or April, May, June, September and November (see your Homeowner Lawn Care sheet). For new lawns this program should start some time after the lawn is established, (for fertilizers this is after 2-3 cuttings, for broadleaf herbicide it should be after 4-6 cuttings and then at normal application times only.) Those containing Pre-emergents should not be used the first season. With a Fall seeding, do not use pre-emergents that next spring. If you are not a 4-times-a-year person, the early spring (step 1) is the most expendable. If you are only doing one application per year, it is best to fertilize in late Fall.
PRUNING
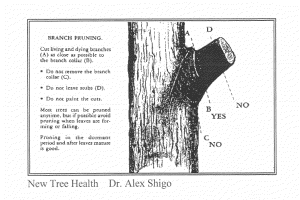
Pruning is an important part of getting a landscape established. Pruning, more than any other task, will predict the outcome of the landscape project because it governs the density and the character of the plants. This is most evident with specimen shrubs and evergreens as well as small trees. However it also impacts shade trees, mass plantings and hedging plants. (See our topic about Pruning and Winter Care)
MOWING
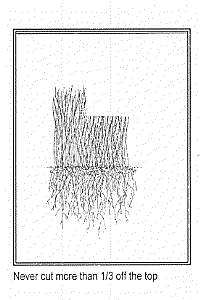 Lawn mowing can be a very enjoyable pastime or a real chore. The difference is in your attitude and not so much the technique. But either way it is the early step to a great yard. You should mow sod for the first time about ten days after installation. (Weather and growth rate may alter the timing.) The first cut should be down to 3" in height, this means that the lawn should be no more than 4" in height at the time of the cut. You should use a small rotary mower with a very sharp blade and make as few turns as possible.
Seeded areas you may not be able to get on for 3-5 weeks after seeding. When the lawn grows to 4-5" high, you can start cutting, but only do areas that need it and let the other areas catch up. You should use a small rotary mower with a very sharp blade and make as few turns as possible. If the lawn gets away from you and is really tall, cut it twice, once at a higher setting and then again at a lower setting. Mulch the clippings back into the lawn, it will protect the soil and is a good habit to get into. Straw in normal amounts should be chopped up as you cut the lawn. Clumps of straw should be broken up and distributed or removed before cutting. Tach (the sticky stuff that is sprayed on the straw) or hydro mulch (the green stuff that is used in place of straw) should not impede mowing and chops up without damaging the mower. Be careful on the first cut, because you may throw out stones.
-
Pruning clematis vines
GROUP 1
Spring flowering Clematis that bloom only on previous years growth (old wood). Little pruning is required, however if needed, prune right after bloom. C. alpina, montana, and macropetala.
GROUP 2
Clematis that bloom in spring on old wood. Prune out dead branches in early spring, don't remove any live branches. After the plant flowers you can do directional/shaping pruning if needed. Examples are Etoile Violette, Mrs. Cholmondeley, Multi Blue, Nelly Moser, Niobe, Ramona and The President.
GROUP 3
Clematis that bloom in summer and bloom on new wood. Cut back hard in late fall or early spring to 8-12" above the ground. This groups includes Contesse De Bouchard, Ernest Markham, Hagley, Jackmanii, Madame Julia Correvon, Rouge Cardinal and many other hybrids.
GROUP 4
(Fall flower only) Clematis that bloom in late summer to fall, on new wood. These can be left until mid- spring when you can see what is alive. 1/3 to 2/3 of the plant should be removed to reinvigorate the plant, leaving the live structure of the plant. More can be removed in real cold winters or if the plant is too large. Sweet Autumn is an example of this group.
-
Troubleshooting tips for your new landscape
BUGS
Insects can be a major problem at any time, but particularly in it's first year. The difficult part is to identify the insect and then know how or if to control them. What level of insect damage are you willing to put up with and what amount of chemicals are you willing to use? Most insects come in waves - the populations go way up, damage is done, and the population then goes back down naturally. Sometimes you will see the damage, and use an insecticide on insects that are approaching the end of their life cycle. The best way to react to an outbreak is to first know the life cycle of the insect and then spray if it is prudent. You should also be aware of the toxicity of an insecticide and how it works before you use it. Toxicities are labeled in three ways:
CAUTION = least toxic (but it is still meant to kill things.)
WARNING = medium toxicity
DANGER = highest toxicity a homeowner can use.
The type of insecticide indicates how it kills insects. For example:
CONTACT KILL: The insecticide enters the insect through its "shell" or opening and kills the insect. If it doesn't die in a ½ hour, it won't. If the insect is not there when you spray, it will not be killed.
RESIDUAL: Kills when the insect ingests a film or residue left on the plant. It takes a day or two to work, but can be effective for 10 days to 2 weeks if it doesn't rain. Leaves a residue that you can come in contact with as well.
SYSTEMIC: The insecticide is taken up by the plant and then the insect eats part of the plant with poison in it and dies. The poison stays in the plant for a long time. It also takes some time to be taken up into the plant.
FUNGUS, BACTERIA AND VIRUSES
1. Sudden wilting or dying of a section of the plant.
2. Fungus visible on the surface of leaves or stems.
3. Dead or discolored areas on the leaves with a ring pattern.
4. Sunken, soft or punky area in the bark.If you see any of these symptoms, it is best to act quickly and bring a sample to Hawks or call our Maintenance Department. This sample should have an example of an infected leaf, a good leaf and one going bad. For most problems there are two scenarios:1) spray at the right time with the right stuff and the plant gets better fast, 2) The particular disease is untreatable . This is somewhat fatalistic, but still the nature of these problems.
One common fungal problem that shows up under the proper conditions in mulched beds is a fungal mass (tan to brown irregular mass, lump at first and powdery later) It should be scooped up with a shovel and disposed of.
WEEDS
The first year weeds can be a major problem. Lawn weeds will be taken care of with a proper lawn program. Weeds in planting beds can be hand pulled or sprayed with Round Up. You may find spraying more effective because it kills the root that can break off and re-grow with hand pulling. Care must be taken not to get any spray on good plants - a piece of cardboard can be useful. Pre-emergent herbicides, like Preen, can also be very useful, but your plants must be established before it can be used safely. Make sure to read the label for proper use.
If you have any questions, please call your Hawks sales representative for solutions or stop by our garden center. If you need help doing the work, remember, Hawks has a full service landscape maintenance department to help you with all of your landscape care.
-
Winter care for roses
Hybrid roses (teas, floribundas, grandifloras and climbers) need help to get through our usually cold and definitely unpredictable Wisconsin winters. The procedures are not particularly time-consuming, but they are necessary to reduce the chance of loss caused by severe cold, drying winter winds, and the radical temperature swings that occur in our climate.
EARLY AUGUST - Stop fertilizing
This lets the rose plant begin the process of going dormant. This includes a reduction in growth and a hardening of stem tissue, which will increase its winter hardiness. Weekly watering should continue until the ground freezes, since the plant needs moisture through the winter.
MID OCTOBER - Mound the soil
Mound 8 to 12" of fresh soil around the base of the plant (DO NOT use existing soil that is around the base of your rose plant.) Remove any diseased leaf debris to avoid re-infection next season and avoid any pruning on the plant at this time. The fresh cuts will create loss of moisture and drying out of stems over the winter months.
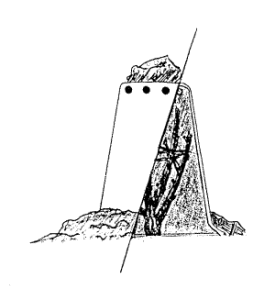 LATE NOVEMBER - Cone over soil option
Rose cones made of foamed plastic or paper mache are frequently used to cover the rest of the rose above the soil line. It may be necessary to do some minimal pruning so the cone can be placed over the rose and set firmly on the ground. Make sure there are at least six ventilation holes around the top of the cone and place a heavy rock or brick on top of the cone to stabilize it from winter winds.
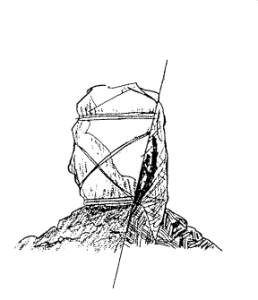
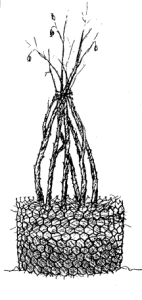 LATE NOVEMBER - Burlap wrap over soil option
The gardeners who prefer not to use cones have a couple of options. Burlap, two to three layers thick, can be wrapped around the entire rose plant and secured with twine. This works very well with climbing roses.
Another method is to use hardware cloth, which is a tightly woven chicken wire. It can be placed around the rose and secured to the ground with sod pins. Fill the inside of the wire all the way to the top with straw or leaves (preferably oak leaves.)
SPRING - Remove the cover
The cover stays on all winter. Remove it when temperature staysat least 40 degrees during the day and night.
SPRING - Remove the soil
When there is no more chance of freezing weather.
Keep in mind that a rose plant that is carefully watered, fertilized, and kept free of insects and diseases during the growing season will always have a much better chance of surviving our Wisconsin winters.
